
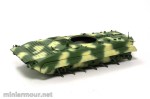
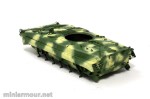
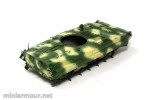
Next step was application of camouflage. There were again two usual questions I had to answer – what colour to be used and how to paint the camouflage.
As for the paint, Syrian BMPs are usually masked using large spots of faded yellow colour. I was again experimenting and mixing Dark yellows, Desert yellows, Buffs and so on. At the end the colour I liked most was very simple – Flat Yellow mixed with White in a ratio approximately 1:3 or 1:4. This shade might still look bit too yellow to some but at least it adds a bit of life to the model and it will nevertheless be toned down during the weathering stage.
As for the method of applying the camouflage I was looking for something between hard-edge and soft-edge look – easier said than done. I was thinking about using masks first, but after some quick tests at the bottom of the model it just did not look right. So, at the end I just applied the camo freehand with the airbrush. I tried to keep the edge not too soft by increasing the airbrush pressure and keeping the nozzle close to the model. It is not perfect but still looks quite good.
Aaaand – I would almost forget, since I want to have that worn-out look, the camo painting was actually preceded by two coats of hairspray, so get ready for some chipping next…

Categories: My models

3 replies »