![PzIBfhlIMG_0413 [Desktop Resolution]](https://miniarmour.net/wp-content/uploads/2014/01/pzibfhlimg_0413-desktop-resolution.jpg)
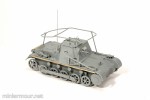
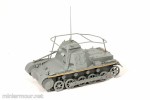
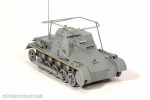
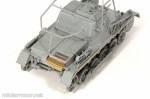
The second of my Christmas projects is this machine. The mouthful name of this tank basically means that it is small command tank based on the Panzer I chassis. The kit is from Dragon and I have bought it quite some time ago, just because I liked the original shape of this vehicle. As many others, the kit was sitting in my stash until I saw color plate of this tank in one of my books just shortly before Christmas. Thinking that this might nice quick project for Christmas break, I opened the box and got started.
The kit is really nice one and packs a lot of details. The fit of the parts is very good, given that the superstructure “tower” has essentially each side molded separately and has to be placed and fit together. I got some small gaps that had to be filled, but this was rather easy, I used the method I have already described here. The roof is not perfectly square as I did not get the upper edges of all the side walls align perfectly, but it is hard to spot. Overall number of parts in the kit is quite limited, so the construction is quick affair. Luckily I did not find anything that would Dragon missed in their instructions, as they usually do… There is few options for use of different parts, that could have been better explained, but it is what it is…
For some reason, the visors are all molded in clear plastic, I don’t think it really makes sense. There are supposed to be clear parts behind these visors, but as you can hardly see anything through the ports, I skipped them. These clear parts are in my opinion more difficult to clear as the plastic is different from regular grey parts, so I would prefer to have them molded as all the other parts.
There are some photoetch parts provided in the kit, though the choice of these parts seems to me bit illogical. There is light mount at the rear end of the vehicle provided in photoetch consisting of multiple tiny parts, and it is not worthwhile in my opinion. On the other hand, number of tool brackets, which are molded in plastic could have been provided in photoetch and it would significantly enhance the visual “richness” of the model. Retrospectively looking, if I could get aftermarket photoetch set for good price, I would go for it.
Assembly of the frame antennae is bit tricky, but with a bit of patience it can be put together in few minutes as the fit of the parts is great. Just be careful cutting the frame off the sprue and cleaning it.
The most boring part of the construction is going to be assembly of the tracks, as these are molded as separate links in sprue, so a lot of cleaning will be required there.


Categories: My models

1 reply »