
As I have progressed quite a bit in the painting and weathering of the model, I have decided to start putting together a base for this model. I have actually spend quite some time thinking about what I want to use and how I want to present the model. This, as usually, resulted in cutting back on the complexity of the base, which I intend to keep just so that it provides the minimum necessary addition to the model.
When building a base, the process of selecting its shape and size differs depending of what I can find in my storage. Either I use the wooden frame for the base (if I have one of the right size), such as the one I am using for this model – this frame is actually a picture frame made of untreated wood, which I have bought at Curry’s art store (they sell for about $10-15). If I don’t have such a frame in size and shape that I would need, I just skip to the second step.
This step involves building the second level of the base, which is actually the ground base on which the model will sit. I either build this to fit the wooden frame (if I am using one) or just make the dimensions appropriate to the model size.
There is one good rule that I usually follow in both cases – I make the first estimate of the dimensions of the base and then reduce it as much as I can so that the base does not have any excessive empty spaces. This helps to keep the future viewer of the model focused on the subject and prevents the base feel boring.
First I start by cutting the filler of the base from the styrofoam. I use the styrofoam used in construction as an insulation, this can be bought at Home Depot in large sheets. I use utility knife with retractable snap-off blade (this one) – when using fully extended new blade this has length of some 4 centimeters and thus can be used to shape the styrofoam to achieve the desired shape of the ground.

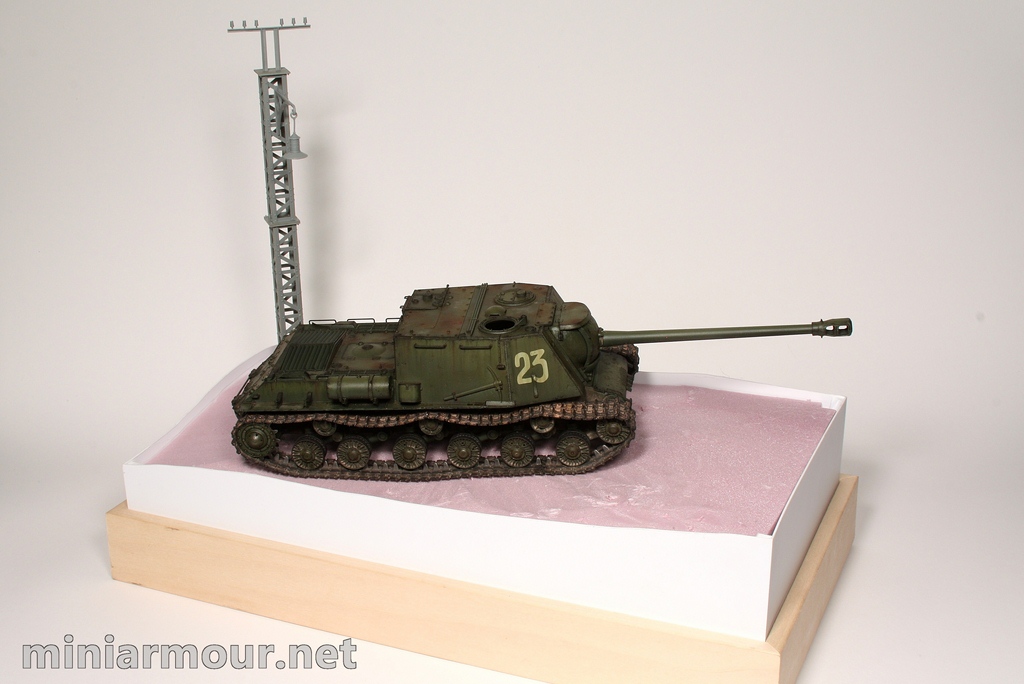
Another rule which I usually follow is to position to model so that it is not completely horizontal, but sits on a slightly sloped ground. This adds quite a bit of dynamism to the presentation of the model as it does not seem to be “sitting” on the flat ground. To strengthen this effect and also to elevate the model slightly to distinguish it from the surrounding area, I use multiple layers of the styrofoam sitting on top of each other.
The frame of this second layer is made of styrene sheets and strips. I cut the four walls so that they copy the shape of the styrofoam filler and add few millimeters for the top layer which will be added and shaped later. I glue this together and in order to strengthen the joints I insert square strips of styrofoam (approximately 6 by 6 millimeters) along the corners.


 The styrofoam then fits into this styrene frame. In this case I have added two strips at the bottom of the frame to strengthen it and to prevent the longer walls from caving inwards. To fit the styrofoam into this frame I had to cut two grooves in the bottom for these strips.


With this base in place you can place your model on it and finalize the desired positioning of the vehicle as well as adding any other elements to the base.
The third rule I would recommend is to add some object onto the base that will add it vertical dimension – such as the telegraph poles in this case. These are sourced from the miniart set and are very nicely detailed and molded.

The next steps will consist of adding the top layer that will form the ground and add all the surface elements.
Categories: My models

2 replies »