After applying the red primer paint layer I proceeded to the next steps – the first one was application of hairspray. I have followed Mike Rinaldi’s technique as described in his book and seen in his workshop. Two thin coats, each dried with a hair dryer were applied rather quickly (see the first picture below).
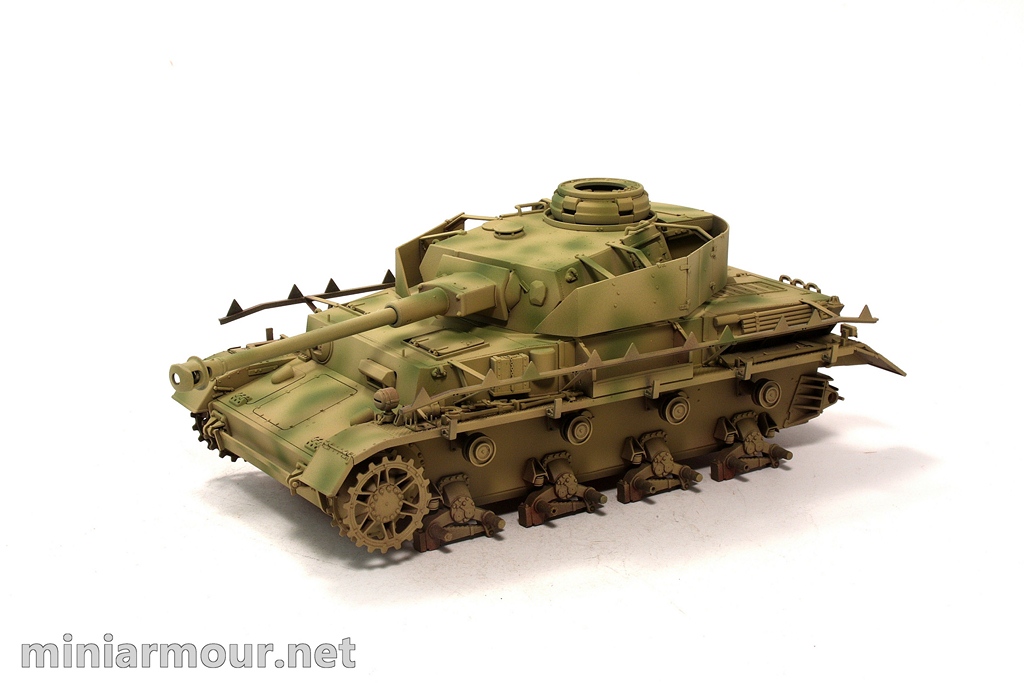
This was followed by the base coat of the dark yellow. Here I have tried few new things or some that I haven’t done for a while. First, I thinned the paint with the Tamiya Acrylic thinner. I am normally using the lacquer thinner, but for chipping with hairspray this is not advisable as it would be too difficult to chip the paint. My problem with the acrylic thinner, that in the past, I have often ended up with the sand paper-like finish of the paint when using it.
The other thing was that I did not add any clear coat (such as the usual Tamiya X-22), again this is to improve adherence and achieve smooth finish. Last, I have thinned the paint only bit more than 1:1 ratio, unlike the 1:4 I normally used.
I applied thin coat, transparent in places and was very happy with how it came out. The finish was flat and very smooth. I don’t think I have ever achieved such nice finish in the past using this approach. Well, we learn all the time…
The paint I have used was a mix of Tamiya Dark Yellow, Flat Yellow and White mixed in an approximate ratio of 8:2:3. I was looking for lighter colour based on my previous experience of ending up with too dark model after the weathering was finished.
On top of it were added few spots of green colour. These were mixed from the Tamiya Flat Green and the base colour mixed in equal parts. As a result of this mix, these spots are very faded in appearance and the contrast is kept to minimum.
So far I am happy with the look of the Panzer IV given that so many new things were tried. Next stop – chipping.

Categories: My models

Interesting. U mention that using tamiya acrylic thinner with acrylic paint gives u sandpaper finish but tamiya lacquer paint used to acroyic paint doesnt? With smooth finish? I must try that.
Also how do paint hard edges on a tank? Masking? Or use brush to paint edges then airbrush to fill up?
Hi Aaron,
as most modellers, when I have started painting with Tamiya acrylics, I have been using Tamiya acrylic thinner. But for long time I was struggling as I was not able to achieve the right combination of how much to thin the paint, air pressure and airbrushing distance, as these determine, what finish you will have. I found out that Tamiya lacquer thinner is actually better and most of the modellers I know use it these days.
For hard edge camo I have tried both methods, recently I have been using masking, but is quite laborous and it is difficult to get the masking tape around all the details on the model. I think next time I am ging to use the other method you mentioned, which I have tried once before, and it can be used to achieve very nice effect.
Cheers,
Vlad
As a noob to the AFV world of hobby I am following these posts with much interest having just embarked upon my first build and paint of a similar Panzer IV (J).
Hi,
greetings to Australia! I am glad you find my blog helpful. I see that you have decided to for the next level right away – zimmerit is not an easy thing to do (you wouldn’t want to see my first attempt at it), but seems you are doing great job…
You will have to adjust the paint process to the fact of having the vehicle with zimmerit, you cannot use the red primer as I did. There’s a great blog Mig Jimenez did on Tiger I with Zimmerit, if you haven’t checked it out, do so, I believe you would find it useful.
Keep on and feel free to ask any questions.
Cheers,
Vlad